Início rápido de programação
O Limelight suporta os protocolos REST/HTTP, Websocket, Modbus e NetworkTables para dados de mira, dados de status e configuração ao vivo. Formatos de saída JSON, Protobuf e bruto estão disponíveis. Consulte a seção de APIs da documentação para obter mais informações.
Para equipes de FRC, o protocolo recomendado é o NetworkTables. O Limelight envia todos os dados de mira, incluindo um despejo completo em JSON, para o NetworkTables a 100hz. As equipes também podem definir controles, como ledMode, janela de corte e mais via NetworkTables. As equipes de FRC podem usar as bibliotecas Limelight Lib Java e C++ para começar com o Limelight em segundos. Limelight Lib é a maneira mais fácil de começar.
# Seu código Python aqui
// Seu código JavaScript aqui
Biblioteca Limelight:
Java
double tx = LimelightHelpers.getTX("");
C++
#include "LimelightHelpers.h"
double tx = LimelightHelpers::getTX("");
double ty = LimelightHelpers::getTY("");
Python
wip
NetworkTables
Java
import edu.wpi.first.wpilibj.smartdashboard.SmartDashboard;
import edu.wpi.first.networktables.NetworkTable;
import edu.wpi.first.networktables.NetworkTableEntry;
import edu.wpi.first.networktables.NetworkTableInstance;
NetworkTable table = NetworkTableInstance.getDefault().getTable("limelight");
NetworkTableEntry tx = table.getEntry("tx");
NetworkTableEntry ty = table.getEntry("ty");
NetworkTableEntry ta = table.getEntry("ta");

//read values periodically
double x = tx.getDouble(0.0);
double y = ty.getDouble(0.0);
double area = ta.getDouble(0.0);

//post to smart dashboard periodically
SmartDashboard.putNumber("LimelightX", x);
SmartDashboard.putNumber("LimelightY", y);
SmartDashboard.putNumber("LimelightArea", area);
C++
#include "frc/smartdashboard/Smartdashboard.h"
#include "networktables/NetworkTable.h"
#include "networktables/NetworkTableInstance.h"
#include "networktables/NetworkTableEntry.h"
#include "networktables/NetworkTableValue.h"
#include "wpi/span.h"
std::shared_ptr<nt::NetworkTable> table = nt::NetworkTableInstance::GetDefault().GetTable("limelight");
double targetOffsetAngle_Horizontal = table->GetNumber("tx",0.0);
double targetOffsetAngle_Vertical = table->GetNumber("ty",0.0);
double targetArea = table->GetNumber("ta",0.0);
double targetSkew = table->GetNumber("ts",0.0);
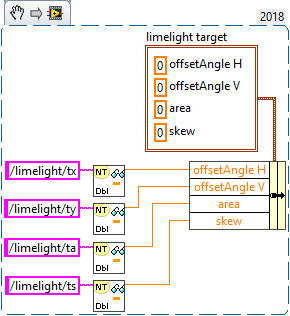
LabVIEW
Python
import cv2
import numpy as np

# runPipeline() is called every frame by Limelight's backend.
def runPipeline(image, llrobot):
    # convert the input image to the HSV color space
    img_hsv = cv2.cvtColor(image, cv2.COLOR_BGR2HSV)
    # convert the hsv to a binary image by removing any pixels
    # that do not fall within the following HSV Min/Max values
    img_threshold = cv2.inRange(img_hsv, (60, 70, 70), (85, 255, 255))

    # find contours in the new binary image
    contours, _ = cv2.findContours(img_threshold,
    cv2.RETR_EXTERNAL, cv2.CHAIN_APPROX_SIMPLE)

    largestContour = np.array([[]])

    # initialize an empty array of values to send back to the robot
    llpython = [0,0,0,0,0,0,0,0]

    # if contours have been detected, draw them
    if len(contours) > 0:
        cv2.drawContours(image, contours, -1, 255, 2)
        # record the largest contour
        largestContour = max(contours, key=cv2.contourArea)

        # get the unrotated bounding box that surrounds the contour
        x,y,w,h = cv2.boundingRect(largestContour)

        # draw the unrotated bounding box
        cv2.rectangle(image,(x,y),(x+w,y+h),(0,255,255),2)

        # record some custom data to send back to the robot
        llpython = [1,x,y,w,h,9,8,7]

    #return the largest contour for the LL crosshair, the modified image, and custom robot data
    return largestContour, image, llpython

